

Table of contents
We've recently launched a brand new in-browser editor for our browser check creation experience! Browser checks are Javascript-powered Playwright/Puppeteer scripts that run on deploy or on a schedule for testing and monitoring websites and web apps.
While this new experience centers around an upgraded text editor, it is much more than just that. The new browser check creation experience builds on the popular Monaco editor from Microsoft, which also powers VS Code under the hood. This post will cover some of the challenges we faced along the way, what we did to overcome them, and tips for others looking to build a modern code editing experience in the browser.
Topics are:
- Extending the Javascript language with a custom language.
- Custom highlighting.
- Custom code completion.
The Before Times..
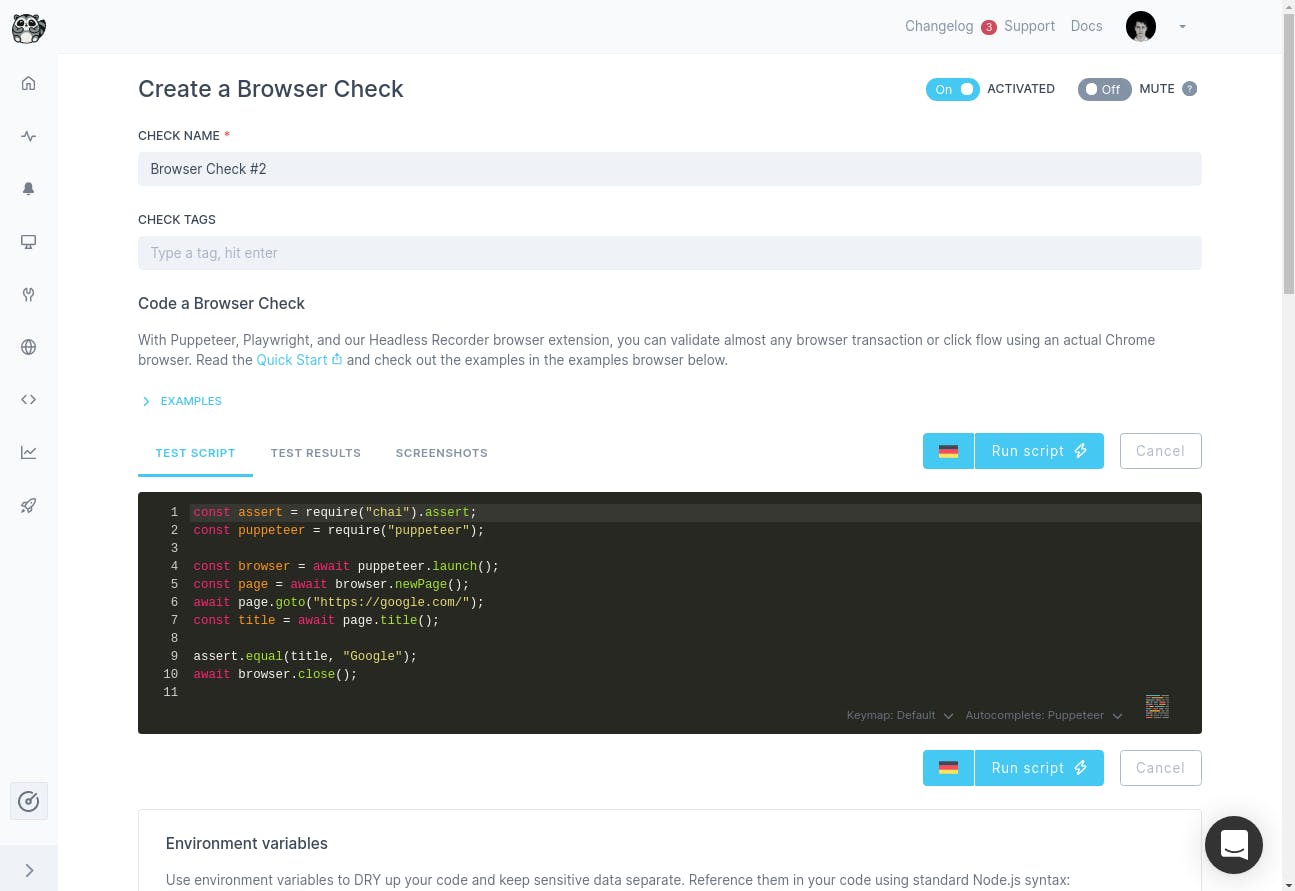
Let's first quickly go over our original — now deprecated — browser check experience. Below is a screenshot of the original new browser check page. The text editor was based on Code Mirror, and all of the other options a Checkly check has available to it (run locations, alert settings, etc.) were listed directly below the code editor.
This caused the whole page to be very long, in turn forcing the user to do a lot of scrolling and context switching.
In replacing our codemirror based editor, we wanted to migrate to something where our users would immediately feel at comfortable in. Therefore, the choice to go with Monaco was easy.
Dreaming Up Something New
To begin, we asked ourselves, what does a typical user need in order to successfully create and edit a browser check?
The primary elements we agreed upon were the following:
- The code itself.
- The logs and/or results i.e. screenshots, etc.
The rest of the information and settings are secondary to the immediate test creation process.
Therefore, the first major UI change was to hide all of those settings sections, such as run location, alert settings, CI/CD triggers, etc. and move them into a drawer component. This left us with a large full-screen editor type experience. Similar to what you might be used to in a Codesandbox or Codepen.
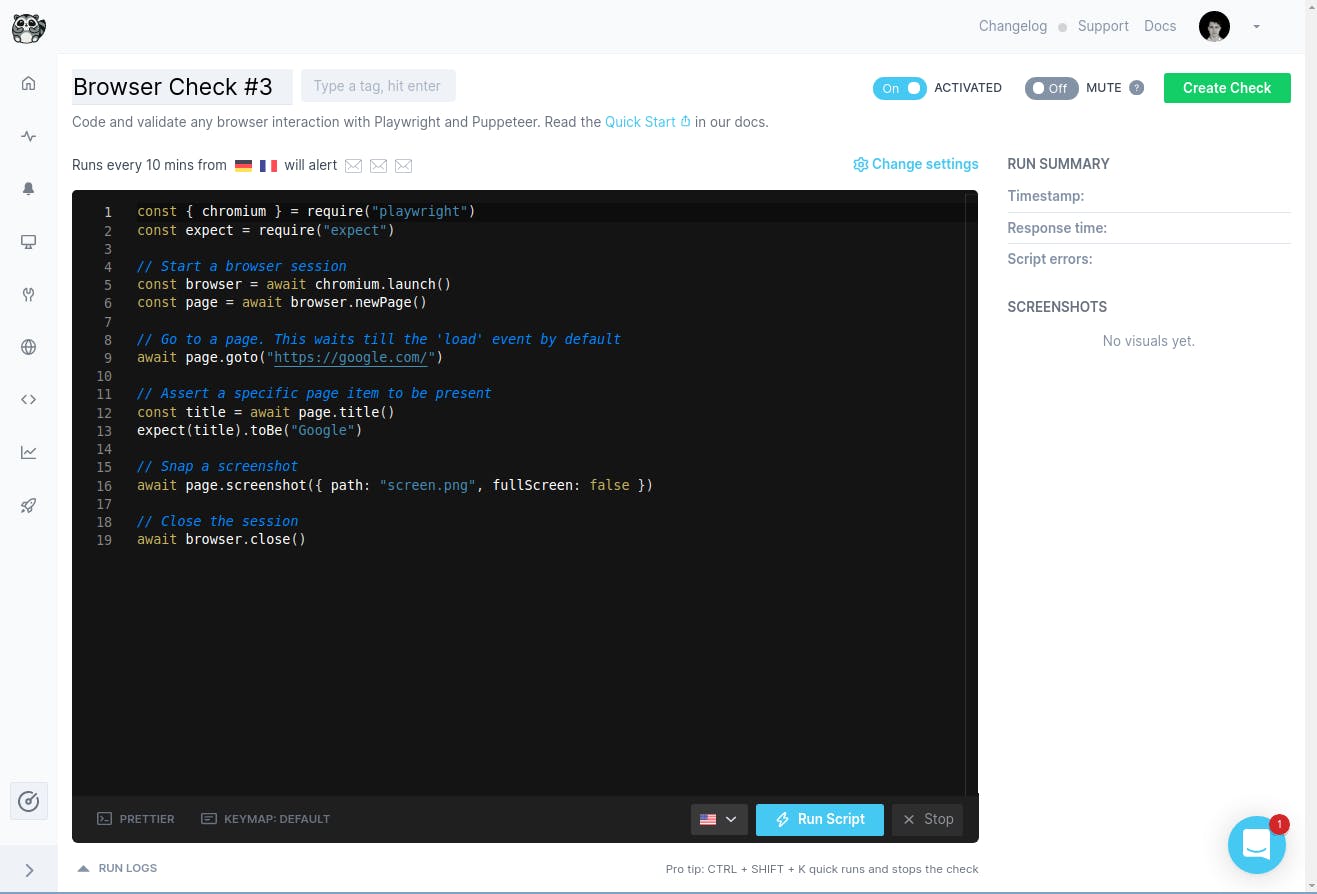
As you can see, the vital UI elements that are left over are of course the editor itself, the run summary / results section on the right, and a fold-open logs section directly below the editor.
We also decided to show the user a summary of their current run location and alert settings choices directly above the editor in that little one-line component.
Challenges
Setting up the UI visually was relatively easy - some flexbox here, some event handlers there. However, certain features were much more difficult than others. We'll take a look at a few of them now.
1. Handlebars Partials
Checkly allows users to define their own snippets and reuse these in any code editor across the app. This is done via Handlebars partials (i.e. {{> login_to_myApp }}) and these templates are replaced with the contents the user has defined before sending the script off to be executed. This allows users to, for example, define the Playwright / Puppeteer login process to their app only once and reuse it across all of their Checkly checks.
While trying to replicate this feature in Monaco, we realized we would have to create an entirely custom language feature and bolt it onto the built-in Javascript language definitions and handler in Monaco.
During this process we ran into a few problems, including:
- Handlebars partials syntax is not allowed in Javascript. What on earth would
{{>mean in Javascript anyway?! Beats me, so we explicitly disabled the resulting error message from being reported to the user - apologies to any user who may have used{{>in their code and was not alerted 😂. - We also wanted to highlight the handlebars partials in a pleasant way and not leave it up to the built-in Javascript tokenizer to mangle. To implement custom syntax highlighting, Monaco actually offers a great api and development workflow.
You can view the tokens generated by the tokenizer in a Monaco instance in your browser (tip: search "Inspect Tokens" in the Monaco command palette). There you can see exactly how pieces of code were parsed and defined according to the Monaco tokenizer.
From there, you can define your own regex for custom tokens and apply this to the Monaco language config (javascriptin our case) before initializing the editor. We registered a fewdelimiter.handlebarstokens for example:
const customTokenizer = {
  tokenizer: {
    root: [
      [/\\{\\{/, { token: 'delimiter.handlebars' }],
      [/\\}\\}/, { token: 'delimiter.handlebars' }],
      [/\\{\\{#/, { token: 'delimiter.handlebars' }],
      [/\\{\\{\\//, { token: 'delimiter.handlebars' }]
    ]
  }
}

const allLangs = await languages.getLanguages()
const { language: jsLang } = await allLangs.find(({ id }) => id === 'javascript').loader()

// Add syntaxhighlighting for handlebars delimiters
for (const key in customTokenizer) {
  const value = customTokenizer[key]
  if (key === 'tokenizer') {
    for (const category in value) {
      const tokenDefs = value[category]
      // eslint-disable-next-line
      if (!jsLang.tokenizer.hasOwnProperty(category)) {
        jsLang.tokenizer[category] = []
      }
      if (Array.isArray(tokenDefs)) {
        jsLang.tokenizer[category].unshift.apply(jsLang.tokenizer[category], tokenDefs)
      }
    }
  }
}
The final piece to the syntax highlighting puzzle revolves around defining ones own Monaco theme and including these custom tokens (delimiter.handlebars) and highlighting colors and font styles.
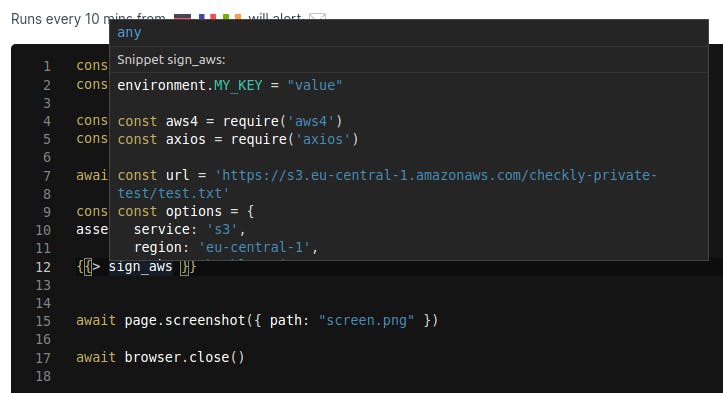
- Finally, we also wanted to offer autocompletion of the Handlebars partials so users could simply enter the partial prefix (
{{>) and get a list of available snippets. Monaco also provides a relatively nice API for this. The tricky part was only including these Handlebars autocomplete options when one was already in a handlebars prefix. As this wasn't a built-in Javascript feature, we had to do some regexing to identify when it was appropriate to show these completion options.
A simplified version of the code looks like this
// Register new completionItemProvider on Monaco's language import
languages.registerCompletionItemProvider('javascript', {
  provideCompletionItems: (model, position) => {
    return {
      suggestions: () => {
        // parse the current suggestion position
        const suggestions = []
        const textUntilPosition = model.getValueInRange({ startLineNumber: position.lineNumber, startColumn: 1, endLineNumber: position.lineNumber, endColumn: position.column })
        const word = model.getWordUntilPosition(position)
        const range = {
          startLineNumber: position.lineNumber,
          endLineNumber: position.lineNumber,
          startColumn: word.startColumn,
          endColumn: word.endColumn
        }
        // Match handlebars opening delimiter
        if (textUntilPosition.match(/.*{{#?>\\s?$/m)) {
          for (const snippet of handlebarsSnippets) {
            // Push handlebars snippets
            suggestions.push(
              {
                label: snippet.name,
                kind: languages.CompletionItemKind.Snippet,
                insertText: ` ${snippet.name} `,
                range: range,
                command: { id: 'editor.action.insertLineAfter' }
              })
          }
          return suggestions
        }
      }
    }
  }
})
With some parsing of the current position the user is asking for a completion on, regexing that line, and building a suggestions object to return to Monaco, we were able to build a completely custom completionProvider for our custom language feature!
2. Hover for Content
Now that we had our own Checkly snippets integrated into Monaco as if they were native Javascript features, we also wanted to give the user a similar experience working with them as they would have with native Javascript functions, methods, and well-typed external libraries. This means context-aware autocomplete and hover to show more details.
Fortunately, Monaco lets you register your own hoverProvider as well. In the callback of your custom hover provider you're provided the current text contents of the editor as well as the current position of the hover in terms of row and column.
It works in a very similar manner to the autocomplete code example shown above. With these details we could do a bit of regexing and if we found that the user was hovering inside one of our custom handlebars partials, we could lookup that snippet by name, get its definition, and surface that information in the hover modal.
We're super happy with the user experience this enables, the user now doesn't have to navigate back to their snippet definition page just to confirm if their snippet actually did or did not do that thing they thought it did.
All together, everything revolving around Handlebars partials / Checkly snippets, works just as if it were a native javascript function or method!
3. Typescript and Autocomplete
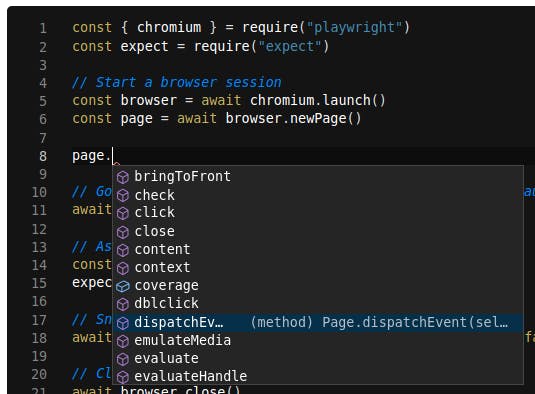
In order to offer a first-class editing experience in the browser, we also wanted all the autocomplete and method descriptions, etc. that one is used to in VS Code, for example.
The Checkly browser check runner ships with a few libraries which the user can take advantage of in their browser check scripts. Since we only have a relatively short static list of packages, we figured we could manually import the @types/package-name Typescript definitions for them all.
This, however, turned out to be easier said than done!
Some of the aforementioned packages did have @types/.. packages which we could install, import via Webpack as raw text and inject into Monaco's Javascript language settings.
For the packages which ship as native Typescript modules, for example moment , we had to first manually concatenate all of the individual type files out of their repositories into one index.d.ts and import that into Monaco as types files importing one another did not work via this method.
Finally, we had to wrap each types package's contents in declare module... . This resulted in the types loading code looking like this, for example:
const puppeteerTypes = require('!!raw-loader!@types/puppeteer/index.d.ts')
const momentTypes = require('!!raw-loader!/src/components/editor/types/moment.d.ts')

const types = [
  {name: 'puppeteer', types: puppeteerTypes},
  {name: 'moment', types: momentTypes}
]

types.forEach(module => {
  languages.typescript.javascriptDefaults.addExtraLib(
    `declare module "${module.name}" {
     ${module.default}
    }`
  )
})
We believe the user experience was improved greatly through providing types for our included packages. Just like in ones desktop VS Code, for example, you can now get all of the method suggestions and descriptions of function arguments, etc. right in our web browser check editor!
Summary
This wasn't just a major rewrite of an important part of our application, but a complete rethinking of the browser check experience. The process of developing this feature was also different to most anything we'd done before. In that, after doing some of the initial work and getting a feel for how long we thought an initial version would take, we set an arbitrary deadline of June 1st to ship a public version, which was approximately a month in the future from that time.
Whichever features were done and polished by then we would simply ship with a beta tag and begin collecting feedback. Any other features or bug fixes could be moved to after-care tickets and worked on piece by piece.
Thankfully all of the challenging issues detailed above were able to be worked out before the first of June and made the cut for the initial release. There are a ton of other useful features planned for this new browser check experience and we cannot wait to share them with you as soon as they are ready!
Like hacking on Javascript and building dev tools? Check out our jobs page.
banner image: "Sunset at Ichinokura". Hasui Kawase, 1930, Japan. Source