
We recently optimized the hell out of our Lighthouse performance score, and one of our landing pages went from a low 70s score to a cool 96 and above score.
Below I describe what started as a quick lunch break peek into the Google Search Console. I recognized that our 'Pingdom alternative' landing page ranks surprisingly well with nearly no investment. BUT the competition was ranking even better. So, why?
Common SEO-knowledge is that Google-Search is using hundreds of ranking factors. You could optimize so called off-page factors like backlinks, on-page factors like the actual word density and wording, and your page performance. This article focuses on the latter.
Page Performance with Google Lighthouse
One of the most common tools to measure your page performance is Google Lighthouse. The advantage of Lighthouse is that you can run it against basically every public site out there. You can easily measure how they are doing in terms of speed, SEO, and other metrics to compare yourself.
This is especially useful for landing page optimizations because the competing pages are easy to spot by just doing a simple google search on your preferred keywords.
Let's dive in:
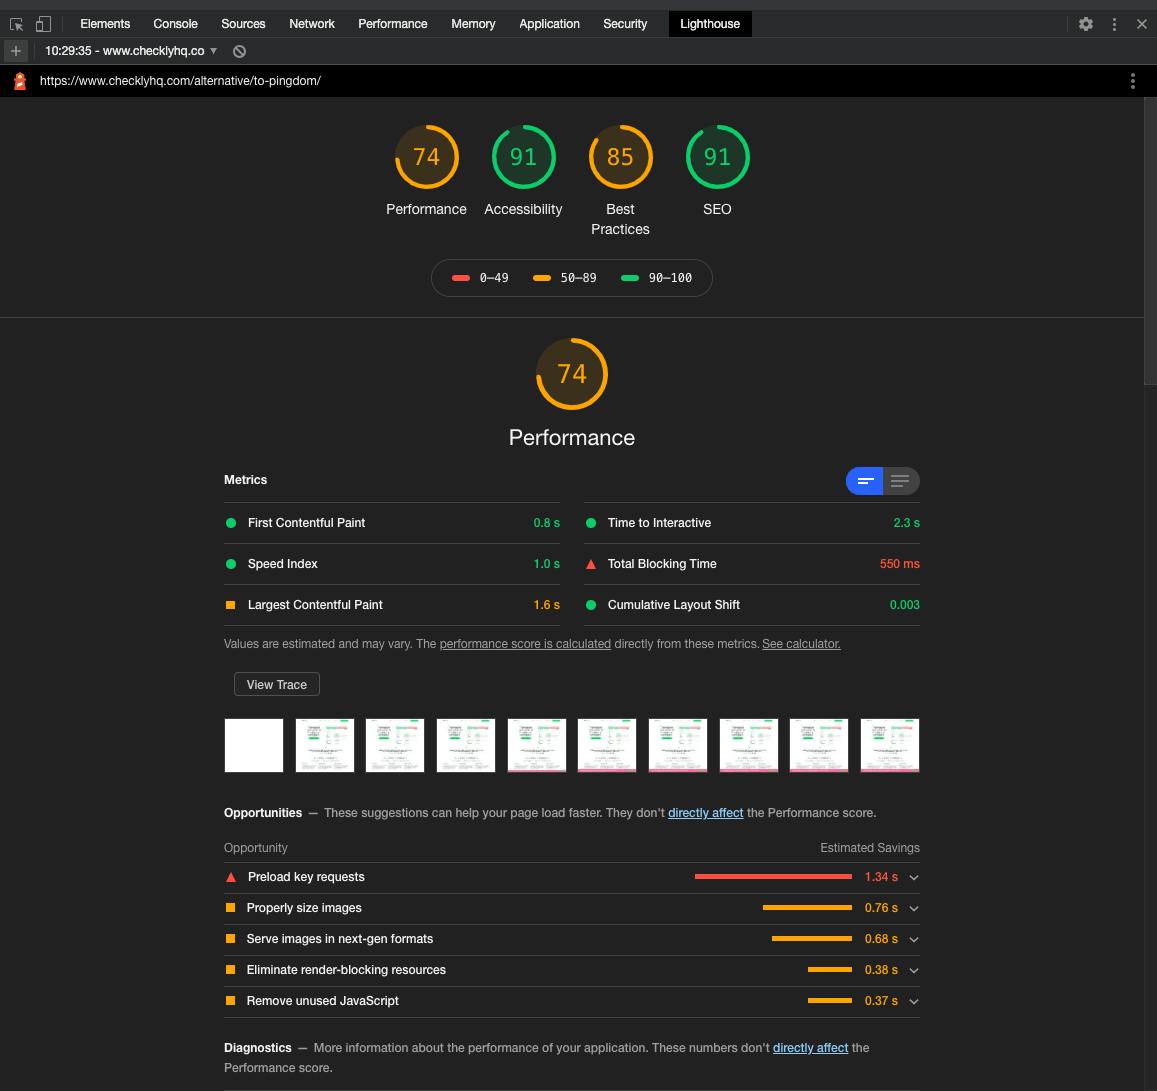
Houston, we have a problem! Some problems became very evident:
- Some key requests are blocking the page rendering for at least 550 ms.
- The network payload is pretty big, with more than 2.5 Mb of mostly images, CSS, and JS.
- We are delivering images as PNGs and might benefit from using a next-gen format.
Preload local fonts & allow for swapping
We used four local fonts on our landing page and figured that we have to improve the font handling because loading them blocked the browser for more than a second.
First, we made sure to preload the fonts by adding preload-statements to our HTML-head:
<link rel="preload" href="/fonts/fakt/FaktSoftPro-Normal.woff" as="font" as="font" type="font/woff2" crossorigin/>
<link rel="preload" href="/fonts/fakt/FaktSoftPro-Blond.woff" as="font" as="font" type="font/woff2" crossorigin/>
<link rel="preload" href="/fonts/fakt/FaktSoftPro-Medium.woff" as="font" as="font" type="font/woff2" crossorigin/>
<link rel="preload" href="/fonts/ionicons.ttf?v=2.0.1" as="font" as="font" type="font/ttf" crossorigin/>
Please note that you need to include 'crossorigin' if you want to preload fonts.
The crossorigin attribute indicates whether the resource should be fetched with a CORS request as the font may come from a different domain. Without this attribute, the preloaded font is ignored by the browser.
Find more here: https://web.dev/codelab-preload-web-fonts/
Second, we introduced a 'font-display: swap;' to the font-face definition in our SCSS files. This enables the browser to use a fallback font and display the text before our custom fonts are loaded. The fonts get swapped afterwards. Essentially, this allows faster rendering and not getting blocked by font downloads.
@font-face {
  font-family: 'fakt-soft';
  src: url("../fonts/fakt/FaktSoftPro-Normal.eot") format('embedded-opentype'),
  url("../fonts/fakt/FaktSoftPro-Normal.woff") format("woff");
  font-weight: 400;
  font-style: normal;
  font-display: swap;
}
PNG-Image compression with IMGBot
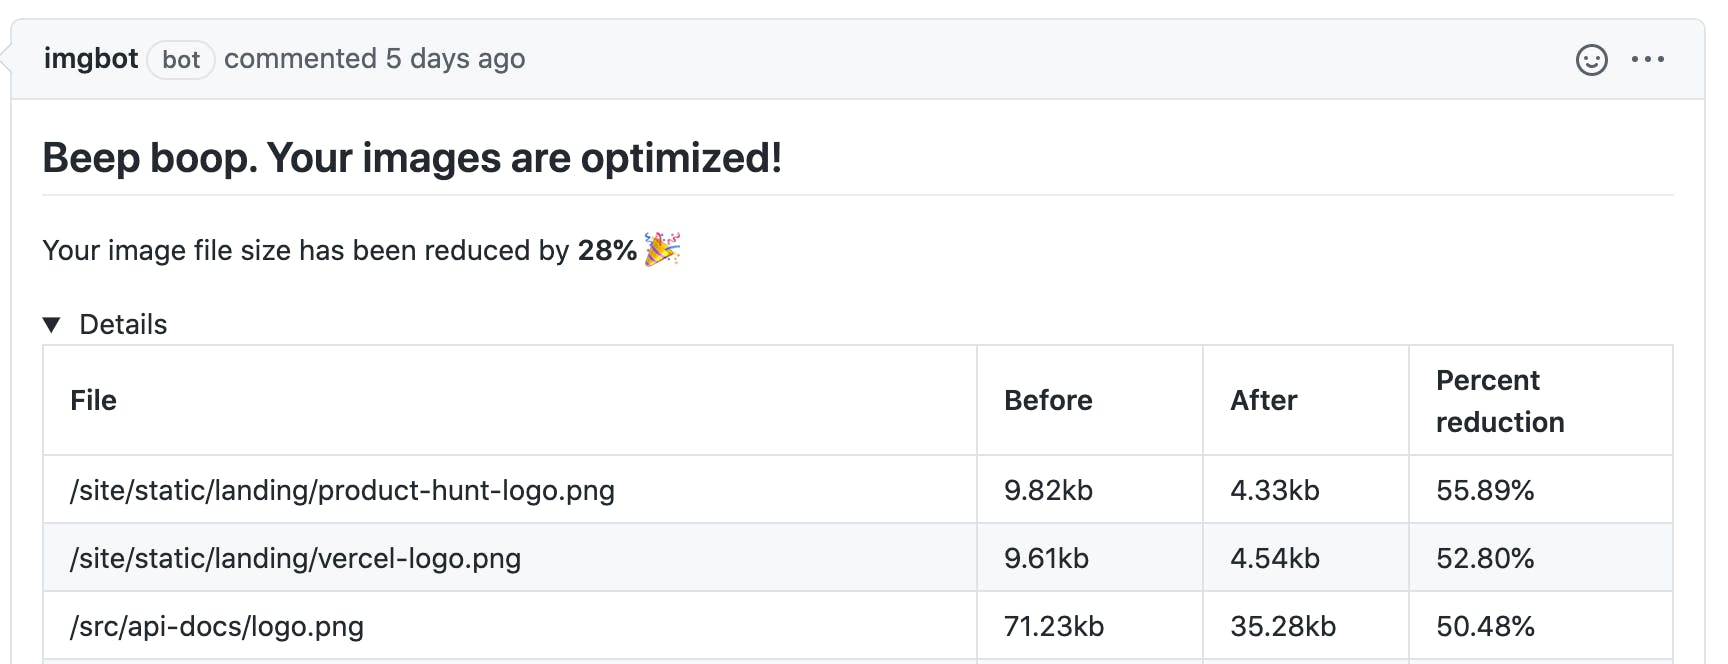
Another significant bottleneck is the sheer size of the images we are using on our page.
Luckily we found a neat little tool that promised to optimize our images without losing quality: Imgbot. Too good to be true? No, it worked! Imgbot reduced our file size by 28% and some of the most used pictures by more than 50% just by applying a lossless encoding. See below..
Convert images to WebP and use the picture tag
Our next step was to implement WebP as one of the next-generation image formats. You can generate WebP pictures easily via Mac-Terminal. I just installed WebP via homebrew:
brew install webpAfterward, I used this command with a for-loop to convert all existing png-images to WebP. You can do the same with jpg images by replacing the 'png' with 'jpg' in the command below.
for i in *.png; do cwebp -q 90 $i -o "${i%.*}.webp"; doneWebP is supported by Chromium and other major browsers but unfortunately not by Safari, but the <picture> HTML tag helps luckily to workaround this:
<picture>
   <source type="image/webp" srcset="/alternative/home-dashboard@2x.webp">
   <source type="image/png" srcset="/alternative/home-dashboard@2x.png">
   <img  class="alternativeto-hero-image img-fluid" src="/alternative/home-dashboard@2x.png" alt="checkly pingdom monitoring dashboard alternative"  />
</picture>
Browsers knowing the picture tag will select the best image for them, and all other browsers will ignore the tag and work with the img-tag.
Converting the images to WebP decreased our already optimized image sizes by another fantastic 37%!
Lazy loading of images
Lazy loading means the image is only fetched when a user can actually see it in their browser. This will speed up the initial loading even further.
Browsers get smarter, and with that, browser-level lazy loading landed this year. Chromium-powered browsers and Firefox support it. The implementation for WebKit (Safari) is in progress. Read more here: Browser-level image lazy-loading for the web
Chromium powered browsers run on at least 77% of all desktop computers. That led us to the decision to use <img loading=lazy> for most of the images. This will get interpreted by the browsers supporting this tag; all others will ignore it and act as before.
<img loading="lazy" class="rounded" src="/alternative/home-dashboard@2x.png" alt="Alternative to Pingdom" />Optimize CSS with PurgeCSS and minification
A 950kb CSS file? Yes, that's what we had thanks to bootstrap, a lot of SCSS, and some other frameworks. Having a website, docs, and an API-documentation all relying on the same CSS file made it almost impossible to figure out what's needed and what isn't.
We used PurgeCSS, a tool to remove unused CSS. It can run in your deployment workflow. We utilize gulp to build and deploy our website code. Gulp-purgecss is an NPM module that integrates PurgeCSS as a build step in your pipeline by simply adding the following commands to the gulpfile.
import purgecss from 'gulp-purgecss'

....

//purgecss
gulp.task('purgecss', () => {
    return gulp.src('./public/css/**/*.css')
        .pipe(purgecss({
            content: ['./public/**/*.html']
        }))
        .pipe(gulp.dest('./public/css'))
})
PurgeCSS was able to decrease our CSS files by more than 80%.
The next logical step was to apply 'minification,' another common optimization, by adding another step to our pipeline. Clean-CSS takes the well-formed CSS code and removes the spacing, indentation, newlines, and comments. These elements are not required by the browsers and use extra storage that needs to get transferred.
import cleanCSS from 'gulp-clean-css';

//minifycss
gulp.task('minify-css', () => {
  return gulp.src('./public/css/*.css')
    .pipe(cleanCSS({debug: true}, (details) => {
      console.log(`${details.name}: ${details.stats.originalSize}`);
      console.log(`${details.name}: ${details.stats.minifiedSize}`);
    }))
  .pipe(gulp.dest('./public/css'));
});
Lazy load Intercom
The Intercom widget is another render-blocking resource. It's not very lightweight. We use Intercom for 99% percent of our customer support and want to continue to do so.
It turns out that there is a way to load Intercom lazily. We can do so by delaying the load of the Intercom-widget until there is a scroll event. We did so by amending the JS-snippet to this:
var intercomLoader = function(){
  		(function(){var w=window;var ic=w.Intercom;if(typeof ic==="function"){ic('reattach_activator');ic('update',w.intercomSettings);}else{var d=document;var i=function(){i.c(arguments);};i.q=[];i.c=function(args){i.q.push(args);};w.Intercom=i;var l=function(){var s=d.createElement('script');s.type='text/javascript';s.async=true;s.src='your_widget_url';var x=d.getElementsByTagName('script')[0];x.parentNode.insertBefore(s, x);};if(document.readyState==='complete'){l();}else if(w.attachEvent){w.attachEvent('onload',l);}else{w.addEventListener('load',l,false);}}})();
          window.Intercom('boot', {
            app_id: 'app_id',
            custom_launcher_selector: '.open-intercom-link'
          })

        	window.removeEventListener('scroll', intercomLoader)
      }
window.addEventListener('scroll', intercomLoader)
Other optimizations
After diving into our site's mechanics, it became apparent that every third party snippet that we are including might negatively impact our page-performance. This led to an assessment of all third-party tools, and — no surprise — we were able to deactivate tools like Heap and Hotjar, which further improved the performance.
Result
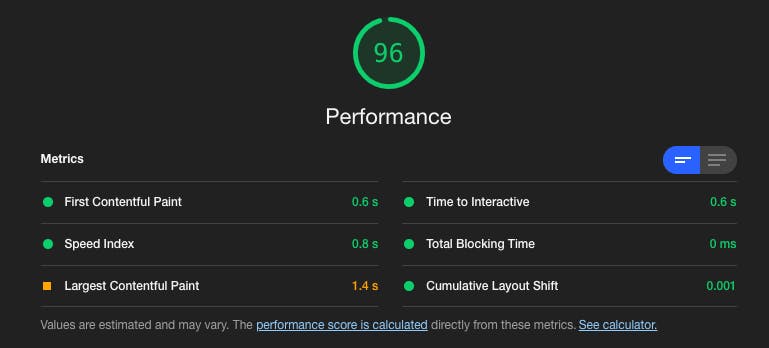
96! We have invested eight hours in improving our landing page's performance and, as a side effect, made https://www.checklyhq.com/ a lot faster. It's obvious to us that there are more improvements to make.
The next weeks will tell if the above will sky-rocket our Google-search ranking.
banner image: "Louisbourg Lighthouse". Dennis Jarvis from Halifax, Canada, 2008. CC